총 2달을 삽질하고 쓰는 정리글.. 좋아요 눌러주시면 감사드리겠습니다
이번 글에서는, Flutter 앱을 통해 직접 쿼리를 날려 DynamoDB에 데이터를 추가하는 과정을 가져보겠습니다.
pubspec.yaml 파일로 이동하여 다음과 같이 두 줄을 추가해줍니다.
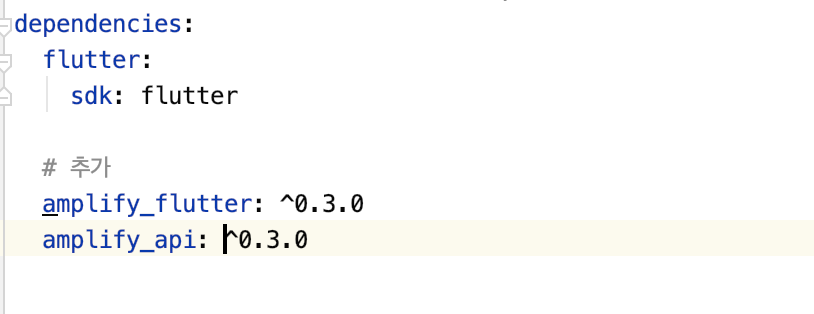
복붙 편하시라고 아래에 적어놓겠습니다.
  amplify_flutter: ^0.3.0
  amplify_api: ^0.3.0
AWS amplify는 Android와 iOS의 각 특정 버전부터 지원이 되는데요, 따라서 프로젝트에서 버전을 수정해주어야합니다.
먼저, android->build->app.gradle 파일로 이동합니다.
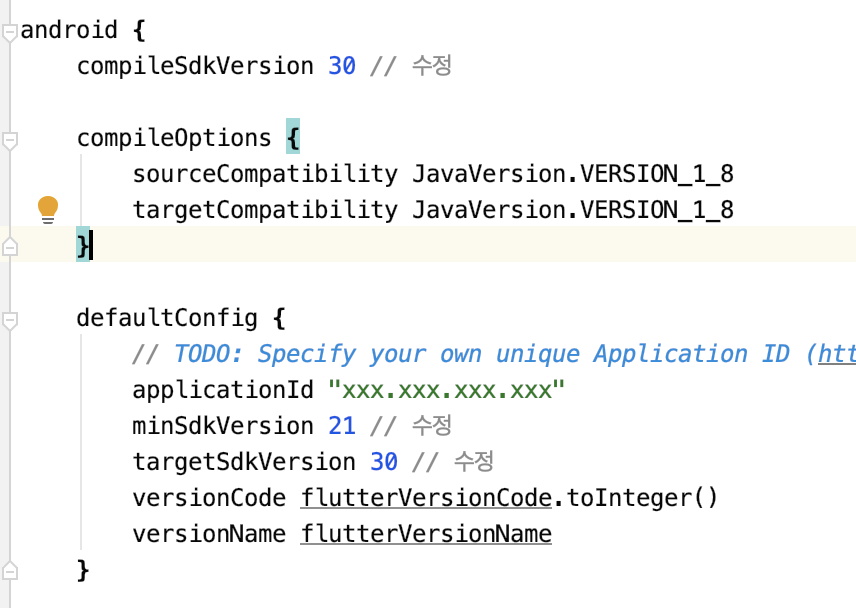
주석처리한 부분을 업데이트하시면 됩니다.
이번엔
iOS -> Podfile 로 이동합니다.

platform 부분이 주석처리되어있을텐데요, 주석을 풀어주시고 13.0으로 변경해줍니다.
이제 main.dart 파일을 수정해줄 것입니다.
추가하는 부분을 하나하나 설명해준 뒤 전체 소스 코드를 올리도록 하겠습니다.
라이브러리 import는 총 세가지가 필요합니다.
import 'package:amplify_flutter/amplify_flutter.dart';
import 'package:amplify_api/amplify_api.dart';
import 'amplifyconfiguration.dart';
앱을 시작하면, Amplify 초기 설정을 세팅해줄 함수가 필요합니다.
  void _configureAmplify() async {
    // Add the following line to add API plugin to your app
    Amplify.addPlugin(AmplifyAPI());

    try {
      await Amplify.configure(amplifyconfig);
      setState(() {
        isConfigured = true;
      });
    } on AmplifyAlreadyConfiguredException {
      print("Tried to reconfigure Amplify; this can occur when your app restarts on Android.");
    }
  }
Todo DynamoDB에 데이터를 추가하기 위한 함수입니다.
  Future<String> CreateTodo() async {

    try {
      String graphQLDocument =
      '''mutation CreateTodo(\$name: String!, \$description: String) {
              createTodo(input: {name: \$name, description: \$description}) {
                id
                name
                description
              }
        }''';
      var variables = {
        "name": "my first todo",
        "description": "todo description",
      };
      var request = GraphQLRequest<String>(document: graphQLDocument, variables: variables);

      var operation = Amplify.API.mutate(request: request);
      var response = await operation.response;

      var data = response.data;

      print('Mutation result: ' + data);
    } on ApiException catch (e) {
      print('Mutation failed: $e');
    }


    return 'SUCCESS';
  }
보시다시피 되게 깁니다.
이전 글에서 말씀드렸다시피, 아직 Flutter 에서는 GraphQL 전용 파서 함수가 존재하지 않아서 mutation 문을 직접 저렇게 입력해주어야 합니다...ㅜㅜ
이제 전체 소스코드입니다.
import 'package:flutter/material.dart';

// 추가
import 'package:amplify_flutter/amplify_flutter.dart';
import 'package:amplify_api/amplify_api.dart';
import 'amplifyconfiguration.dart';


void main() {
  runApp(const MyApp());
}


class MyApp extends StatefulWidget {
  const MyApp({Key? key}) : super(key: key);

  @override
  _MyAppState createState() => _MyAppState();
}

class _MyAppState extends State<MyApp> {

  bool isConfigured = false;

  @override
  void initState() {
    super.initState();
    _configureAmplify();
  }

  void _configureAmplify() async {
    // Add the following line to add API plugin to your app
    Amplify.addPlugin(AmplifyAPI());

    try {
      await Amplify.configure(amplifyconfig);
      setState(() {
        isConfigured = true;
      });
    } on AmplifyAlreadyConfiguredException {
      print("Tried to reconfigure Amplify; this can occur when your app restarts on Android.");
    }
  }


  Widget build(BuildContext context) {
    return MaterialApp(
      title: 'title',
      home: Scaffold(
        body: Center(
          child: isConfigured ? createWidget() : Text('Loading'),
        ),
      )
    );
  }
}

class createWidget extends StatefulWidget {
  const createWidget({Key? key}) : super(key: key);

  @override
  _createWidgetState createState() => _createWidgetState();
}

class _createWidgetState extends State<createWidget> {


  Future<String> CreateTodo() async {

    try {
      String graphQLDocument =
      '''mutation CreateTodo(\$name: String!, \$description: String) {
              createTodo(input: {name: \$name, description: \$description}) {
                id
                name
                description
              }
        }''';
      var variables = {
        "name": "my first todo",
        "description": "todo description",
      };
      var request = GraphQLRequest<String>(document: graphQLDocument, variables: variables);

      var operation = Amplify.API.mutate(request: request);
      var response = await operation.response;

      var data = response.data;

      print('Mutation result: ' + data);
    } on ApiException catch (e) {
      print('Mutation failed: $e');
    }


    return 'SUCCESS';
  }

  @override
  Widget build(BuildContext context) {
    return FutureBuilder(builder: (context, snap) {

      if(!snap.hasData) {
        return Text('POSTING...');
      } else {
        return Text('SAVED');
      }

    },
    future: CreateTodo(),);
  }
}
설명드리겠습니다.
1. 앱 맨 처음 실행
2. _configureAmplify() 비동기 실행
이 함수는 언제 끝날지 모르기에 비동기로 처리합니다. 함수가 다 끝날 경우 setState로 isConfigured를 true로 설정해줍니다.
3. configure가 끝나면, createWidget 위젯이 실행됩니다. 이 위젯에는 FutureBuilder가 달려있는데,
FutureBuilder는 future를 인자로 받은 createTodo()함수를 실행합니다.
마찬가지로 createTodo는 비동기함수이므로, 끝나지 않았다면 snap.hasData 가 false로 리턴되고
완료되면 snap.hasData가 true로 리턴됩니다. 이를 활용합니다.
(참고로 createTodo 리턴값을 'Success'로 두었기에, snap.hasData가 true일 때, snap.data로 데이터를 얻어보면 'Success'가 나옵니다.)
즉,
Text('Loading') 출력 -> _configure 완료 -> Text('POSTING...') 출력 -> createTodo 완료 -> Text('SAVED') 순서가 됩니다.
앱을 실행하고, 곧바로 앱에 SAVED가 출력됨을 확인한 뒤, DynamoDB에 들어가봅니다.
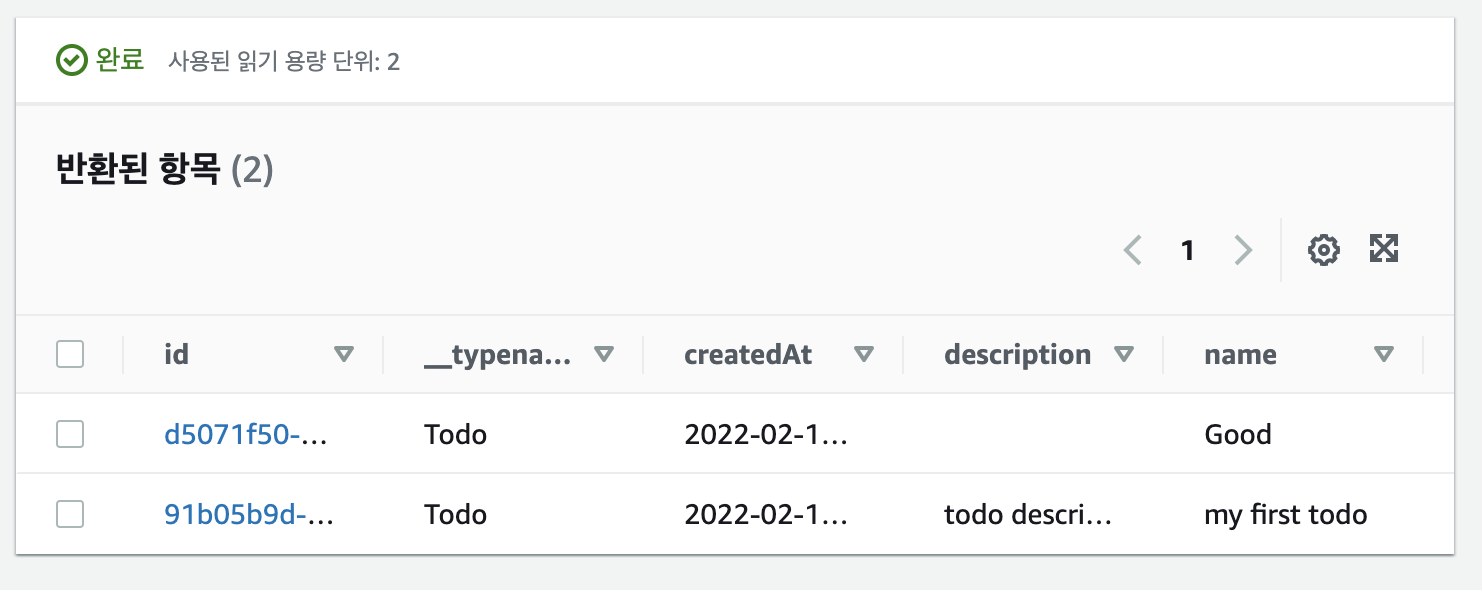
첫번째 줄은 이전 시간에 넣은 것이고, 두번째 줄에 이번에 넣은 데이터가 들어간 것을 확인할 수 있습니다.
확인할 수 없다면 새로고침 아이콘을 눌러보세요.
고생하셨습니다!!
2달간 삽질한 뒤 공부한게 너무 힘들었습니다. 저같이 고생하시는 분들이 없으셨으면 해서 정리글을 올립니다.
도움이 되셨으면 좋겠습니다. 다음 글에 뵙겠습니다.
'[클라이언트] > [Flutter]' 카테고리의 다른 글
| Flutter와 Amplify GraphQL (0) | 2022.02.14 |
|---|---|
| [Flutter] Amplify GraphQL 클라우드 기반 앱 만들기 [3] (0) | 2022.02.11 |
| [Flutter] Amplify GraphQL 클라우드 기반 앱 만들기 [1] (0) | 2022.02.10 |
| setState 원리 (0) | 2021.10.29 |
| [Flutter] TextField에 값을 입력할 때 마다 화면이 다시 그려지는 건가? (0) | 2021.09.17 |

